Plugins
Revolution EDA Plugins
This guide explains what plugins are in Revolution EDA, how users install and use them, how developers create them, how config.json works, and how plugins are published to the Revolution EDA plugin registry.
Quick Orientation
- Plugins extend Revolution EDA without changing the core application.
- End users typically encounter plugins as extra menu items, new editor actions, or support for additional view flows.
- Most users install plugins through
Tools -> Plugins -> Setup Plugins.... - Developers package plugins as Python packages with a
config.jsonfile and callable callback functions.
What Plugins Are
Plugins are add-ons that extend Revolution EDA without modifying the core application. Typical plugin categories are:
- Simulation workflows
- Result plotting tools
- AI-assisted design tools
- Custom view handlers and editor menu actions
In daily use, plugins usually appear as additional menu actions in editors or as handlers for specific view types.
How Plugins Are Loaded
At startup, Revolution EDA loads plugins from the directory configured by REVEDA_PLUGIN_PATH.
- The loader scans that directory with
pkgutil.iter_modules(). - Each discovered package is imported.
- The app logs discovery/load status in
reveda.log. - The plugin’s
config.jsonis read to add menu actions.
Important:
- If
REVEDA_PLUGIN_PATHis not set, plugins are not loaded byreveda.py. - Use
Tools -> Plugins -> Setup Plugins...and application setup paths to configure plugin location.
Plugin Folder Structure
Each plugin should be a Python package under the plugin directory:
<plugins_path>/
  myPlugin/
    __init__.py
    config.json
    <implementation>.py
    README.md            (recommended)
Minimum required files:
__init__.pyso Python can import the packageconfig.jsonfor metadata and menu definitions
Using Plugins (End Users)
Most users only need three steps:
- Open the plugin registry UI from
Tools -> Plugins -> Setup Plugins.... - Install the plugin you want.
- Restart Revolution EDA.
Install from Plugin Registry UI
- Open Plugins Registry Dialogue:
Tools -> Plugins -> Setup Plugins.... - The Plugin Registry window downloads plugin metadata from:
https://raw.githubusercontent.com/eskiyerli/revolutionEDA_plugins/main/plugins.json
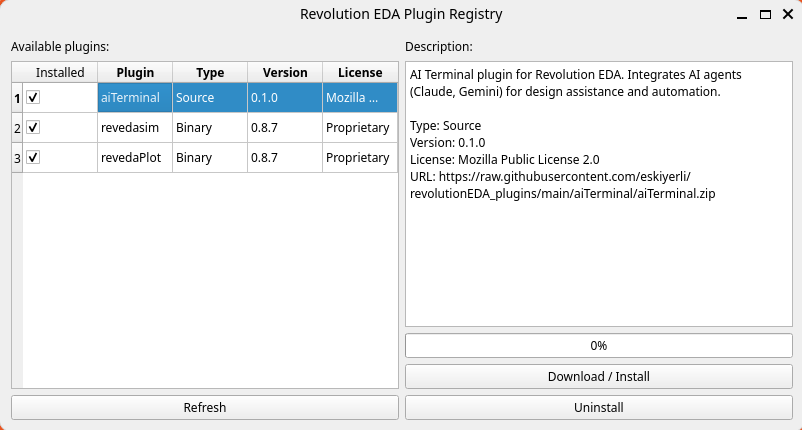
- Select a plugin and click
Download / Install. - Restart Revolution EDA after installation.
Notes:
sourceplugins use a singleurlfield in the registry.binaryplugins can providebinary_urls; the app chooses the best URL for your OS, CPU, and Python version.
Uninstall
- Open
Tools -> Plugins -> Setup Plugins.... - Select an installed plugin.
- Click
Uninstall. - Restart Revolution EDA.
Manual Install
- Copy plugin folder into your configured plugins directory (
REVEDA_PLUGIN_PATH). - Ensure plugin contains
__init__.pyandconfig.json. - Restart the app.
config.json Explained
The plugin loader reads each plugin’s config.json and uses menu_items to inject menu actions.
What config.json Actually Does At Runtime
In the current implementation, config.json is used for menu/action registration, not for plugin import.
- Plugin import/discovery is done by folder/package name via
pkgutil.iter_modules(). - After import, the loader reads
<plugin>/config.json. - The loader iterates
menu_itemsand creates UI actions. - For each action, it resolves
callbackwithgetattr(plugin_module, callback_name)and connects it. - If callback is missing, that menu item is skipped.
What is effectively required in config.json for behavior:
menu_itemslist- For each item:
location,menu,action,callback
What is metadata only (useful to users/maintainers, but not used by menu wiring logic):
plugin_name,plugin_version,description,license,author,copyright
Example:
{
  "plugin_name": "myPlugin",
  "plugin_version": "0.1.0",
  "description": "Example plugin",
  "license": "Mozilla Public License 2.0",
  "author": "Your Name or Company",
  "menu_items": [
    {
      "location": "menuBar",
      "menu": "Tools",
      "action": "My Action",
      "text": "Run My Action",
      "callback": "runMyAction",
      "shortcut": "Ctrl+M",
      "checked": 0,
      "apply": ["schematicEditor", "symbolEditor", "layoutEditor"]
    }
  ]
}
Key fields in menu_items:
menu: existing menu name where action is added (for exampleTools,Simulation,Results)callback: function name in plugin module (__init__.pyimported symbols)apply: list of window class names where action is visible- Optional:
text,icon,shortcut,checked
Real Examples
aiTerminal example:
plugins/aiTerminal/config.jsondefines one menu item inTools.callbackistoggleAITerminal.plugins/aiTerminal/__init__.pyexposestoggleAITerminal.plugins/aiTerminal/aiTerminal.pyimplementsdef toggleAITerminal(editorWindow): ....
revedasim example:
plugins/revedasim/config.jsondefinesSimulation Environment...underSimulationmenu forschematicEditor.callbackisstartRevedasim.plugins/revedasim/__init__.pyexposesstartRevedasim.plugins/revedasim/simMainWindow.pyimplementsdef startRevedasim(schematicEditor): ....
Important distinction:
config.jsondoes not define view-type dispatch.- View dispatch uses plugin module attributes/functions such as
viewTypes,createCellView, andopenCellView(as used byrevedasim).
Practical rules:
- Keep plugin folder name and importable package name consistent.
- Ensure callback functions are exposed and importable.
- Keep import side effects minimal to avoid startup failures.
Creating a Plugin
- Create a package directory under your plugins path.
- Add
__init__.pywith callable functions used by menu callbacks. - Add
config.jsonwith metadata andmenu_items. - Test by restarting Revolution EDA and checking
reveda.log. - If needed, add support for view opening by exposing
viewTypespluscreateCellViewand/oropenCellViewin the plugin module.
Minimal __init__.py example:
def runMyAction(editor_window):
    editor_window.logger.info("My plugin action executed")
Plugin Registry (plugins.json) Format
The online plugin catalog is a JSON file with a top-level plugins list.
Example:
{
  "plugins": [
    {
      "name": "aiTerminal",
      "version": "0.1.0",
      "license": "Mozilla Public License 2.0",
      "type": "source",
      "description": "AI assistant terminal plugin",
      "url": "https://raw.githubusercontent.com/eskiyerli/revolutionEDA_plugins/main/aiTerminal/aiTerminal.zip"
    },
    {
      "name": "revedasim",
      "version": "0.8.8",
      "license": "Proprietary",
      "type": "binary",
      "description": "Simulation plugin",
      "binary_urls": {
        "linux-x86_64-py313": "https://raw.githubusercontent.com/eskiyerli/revolutionEDA_plugins/main/revedasim/linux-x86_64-py313.zip"
      }
    }
  ]
}
For binary plugins, key matching priority is:
{os}-{arch}-py{major}{minor}{os}-{arch}{os}- fallback
url
Where values come from Python runtime information used by the app.
How To Upload a Plugin to the Revolution EDA Plugin Repository
Current workflow is repository-based (not an in-app upload button):
- Package your plugin as a ZIP that extracts into a plugin folder (for example
myPlugin/). - Clone
revolutionEDA_pluginsrepository.https://github.com/eskiyerli/revolutionEDA_plugins - Add your zip file(s) to repo directory.
- Add or update an entry in that repository’s
plugins.json. - For binary plugins, provide
binary_urlsentries for supported platform/Python combinations. - Open a pull request.
- Include plugin name and version in the pull request description.
- Include license in the pull request description. Plugins in Revolution EDA can have their own license terms, independent of Revolution EDA licensing, including charging fees for licenses.
- Include a short description in the pull request description.
- Include source/binary ZIP URLs in the pull request description.
- Include tested platforms in the pull request description.
- After merge, users can install from
Tools -> Plugins -> Setup Plugins....
Recommended release checklist:
- Bump plugin version in your plugin and registry entry
- Verify ZIP layout and callback imports
- Test clean install from registry URL
- Confirm menu actions appear in target editors
Troubleshooting
Plugin not shown:
- Verify
REVEDA_PLUGIN_PATHpoints to the correct folder. - Verify plugin folder contains
__init__.pyand validconfig.json. - Restart app after install/uninstall.
Plugin found but action missing:
- Check
menuname matches an existing menu in target window. - Check
applyincludes the actual editor class name. - Check callback function exists in the plugin module.
Import/load failure:
- Inspect
reveda.logforFailed to load plugin ...errors. - Install missing Python dependencies in the same environment used by Revolution EDA.
Related Files
reveda.pyrevedaEditor/backend/pluginsLoader.pyrevedaEditor/gui/pluginsRegistry.pyplugins.json- Binary Plugins document.