Console Window
Application Startup (reveda.py)
reveda.py is the single entrypoint for the entire application. It creates the custom
revedaApp (a QApplication subclass), resolves paths, and opens the main window.
Startup Sequence
- Parse command-line arguments — supports
--project <path>(open a specific project directory) and--switching(internal flag used during project restarts to show a splash screen). - Create
revedaApp— the application class resolves the project directory, shows a splash screen, and loads environment variables. - Project directory resolution — priority order:
- Explicit
--projectargument - Current working directory (if writable)
~/reveda_projects/as a fallback (user is prompted to confirm/create)
- Explicit
- Environment variable loading —
.envfiles are loaded with the following priority:- Project-specific
.env(in the project directory) - User-level
.env(in~/.reveda/) - Bundled
.env.example(in the install directory)
- Project-specific
- Central directory setup —
~/.reveda/is created if needed. It holds the compiled license module, a shared plugins directory, and user-level settings. - PDK path resolution —
REVEDA_PDK_PATHfrom environment; falls back to the bundleddefaultPDK/. Relative paths are resolved against the project directory first, then the install directory. - Plugin path resolution —
REVEDA_PLUGIN_PATHfrom environment; falls back to~/.reveda/plugins/. - License path setup —
~/.reveda/is appended tosys.pathso that the compiledrevedaLicensemodule is discoverable. In development mode, the source-relativerevedaLicense/directory takes priority. MainWindowcreation — the main window initializes menus, actions, the library browser, thread pool, and the embedded Python console.ProjectManager.open_project()— loads the project’s.env, PDK, plugins,library.json, andreveda.conffor the target directory.- Show main window and dismiss splash — once the window is visible the splash is removed and the Qt event loop begins.
Command-Line Usage
# Open a specific project directory
reveda --project /path/to/my/project

# Or simply run from the project directory
cd /path/to/my/project
reveda
Application Restart for Project Switching
When the user switches projects (File -> Open Project... or a recent project entry), the
application performs a clean restart:
- Current state is saved to
reveda.conf. - The target project path is stored in
REVEDA_RESTART_PROJECT. - The app exits with exit code
99(RESTART_EXIT_CODE). main()detects the restart code and spawns a new process with--project <new_path> --switching.- The restart logic handles AppImage, Nuitka standalone binaries, and source-mode runs transparently.
Typical Workflow
- Launch Revolution EDA from the project directory, or use
--project <path>. - The application loads
.env, library definitions, and saved state from the project. - Open the Library Browser from
Tools -> Library Browser. - Create or open a library.
- Create a cell and then create or open a cellview such as
schematic,symbol, orlayout. - If needed, configure PDKs, plugins, and library registries from the main window menus.
- To switch to a different project, use
File -> Open Project...orFile -> Recent Projects— the application will restart cleanly with the new configuration.
Menu Actions You Will Use Most
File Menu
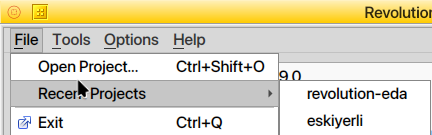
The main window File menu manages project-level operations and application lifecycle.
File -> Open Project...: Opens a project directory and restarts the application to load the new project’s configuration cleanly.File -> Recent Projects: Lists the most recently opened project directories (up to 5). Selecting an entry restarts the application pointing at that project.File -> Exit: Closes the application (prompts for confirmation).
| Action | Shortcut | Notes |
|---|---|---|
File -> Open Project... | Ctrl+Shift+O | Opens a project directory (triggers restart). |
File -> Recent Projects | — | Quick access to previously opened projects. |
File -> Exit | Ctrl+Q | Closes Revolution EDA (after confirmation). |
Project Management
Revolution EDA uses a project directory concept. A project directory contains:
.env— environment variables (PDK path, plugin path, VA module path)library.json— library definitions for the projectreveda.conf— saved application state (window geometry, view lists, thread pool settings)
How project loading works (via ProjectManager):
- On startup, the
revedaAppresolves the project directory from the--projectargument, the current working directory, or the default~/reveda_projects/. ProjectManager.open_project()is called with the resolved directory. It:- Validates the directory exists and is readable.
- Saves the current project state (if switching from another project).
- Loads
.env(copies.env.examplefrom the install directory if missing), clearing stale environment variables to prevent leakage between projects. - Resolves and applies PDK and plugin paths.
- Loads
library.json(supports bothlibdefsandincludeformats). - Loads and applies
reveda.conf(window geometry, view lists, thread pool count). - Updates the recent projects store and window title.
Switching projects:
When you select a different project directory via File -> Open Project... or the
Recent Projects menu, ProjectManager.switch_project():
- Saves the current project state to
reveda.conf. - Records the target in the recent projects store.
- Sets
REVEDA_RESTART_PROJECTand exits with code99. main()relaunches the process with--project <target> --switching.
This guarantees that PDKs, plugins, and all imported modules are loaded cleanly without stale state from the previous project.
Recent projects are persisted in ~/.reveda/reveda_settings.ini (via QSettings)
and survive application restarts. Up to 5 entries are stored, most recent first.
Non-existent project directory: If the resolved project directory does not exist on startup, the application shows a dialog with three choices: Create it, Browse for another directory, or Cancel (exit).
Tools Menu
The Tools menu is the main control center of the application.
Most actions in this menu open a dedicated window or dialog rather than directly modifying
the current design. In practice, Tools is where you configure application resources,
import external design data, and launch utility editors that support the main schematic,
symbol, and layout workflows.
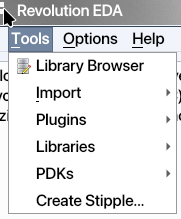
It includes the following menu items:
Library BrowserImportPluginsLibrariesPDKsCreate Stipple...
Library Browser
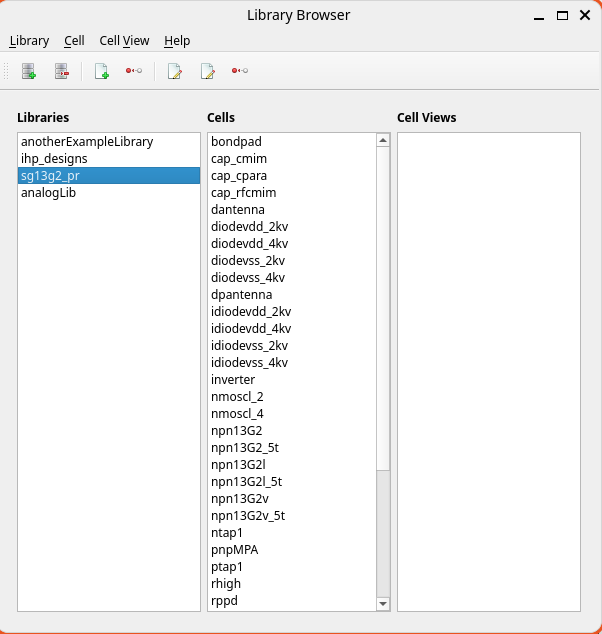
The Library Browser is the main user workspace for opening and organizing design data.
From the Library Browser, users typically:
- create or open libraries
- create, rename, copy, or delete cells
- create, open, copy, rename, or delete cellviews
It is also the normal entry point into the actual editors. Once a library and cell exist, you usually open a cellview from here and continue your work in the schematic, symbol, layout, or config window associated with that view.
In day-to-day use, think of the Library Browser as the design-data manager for the whole project: it shows the available libraries, their cells, and the set of cellviews stored in each cell.
Implemented cellview types include but are not limited to:
| Cellview | Tool |
|---|---|
schematic | Schematic Editor |
symbol | Symbol Editor |
layout | Layout Editor |
config | Config Editor |
veriloga | Text editor / linked Verilog-A flow |
spice | Text editor / linked SPICE flow |
pcell | Text editor / PCell reference flow |
revbench | Simulation environment (when available) |
Import Submenu
The Import submenu is used to bring design data in various formats into Revolution EDA.

Available import actions include:
Import Verilog-a file...Import Spice file...Import KLayout Layer Prop. File...Import Xschem Symbols...Import GDS...
These actions are used to build libraries, symbols, and layouts from external sources.
The import tools serve different purposes:
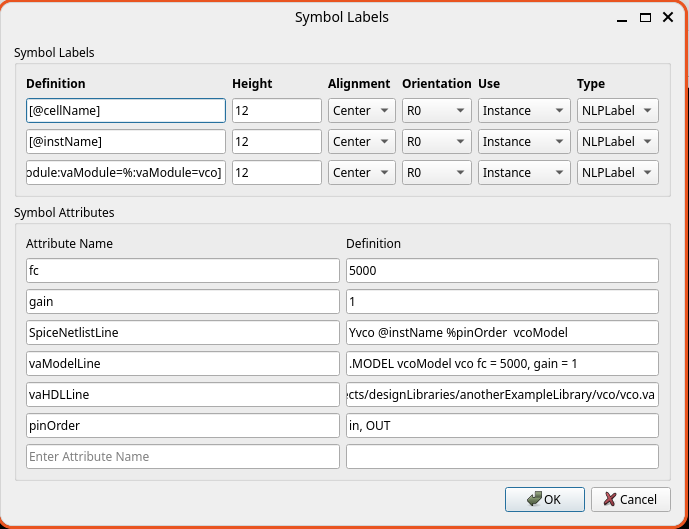
Import Verilog-a file...: imports a Verilog-A module into a library/cell as a Verilog-A view. This flow is useful when you already have behavioral model source and want to add it to a design library. The import dialog can also create a symbol for the module.
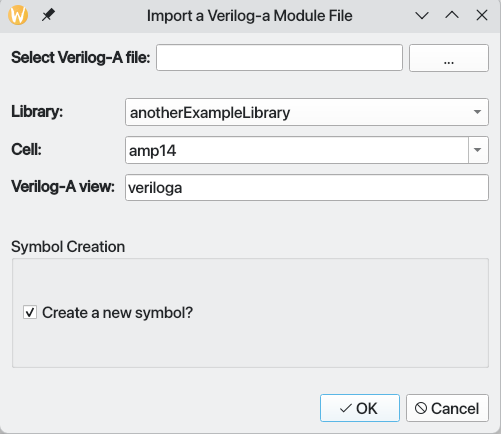
If Create a new Symbol checkbox is checked, a new symbol for the Verilog-A module will be
generated. You will be able to determine the pin locations and stub size in the symbol
editor after import.

Generated symbol will have the correct attributes set for successful netlisting and simulation with Xyce simulator.
Import Spice file...: imports a SPICE subcircuit into a selected library/cell as a SPICE view. Like the Verilog-A flow, this is a convenient way to seed a design library from an existing netlist and optionally create a matching symbol.
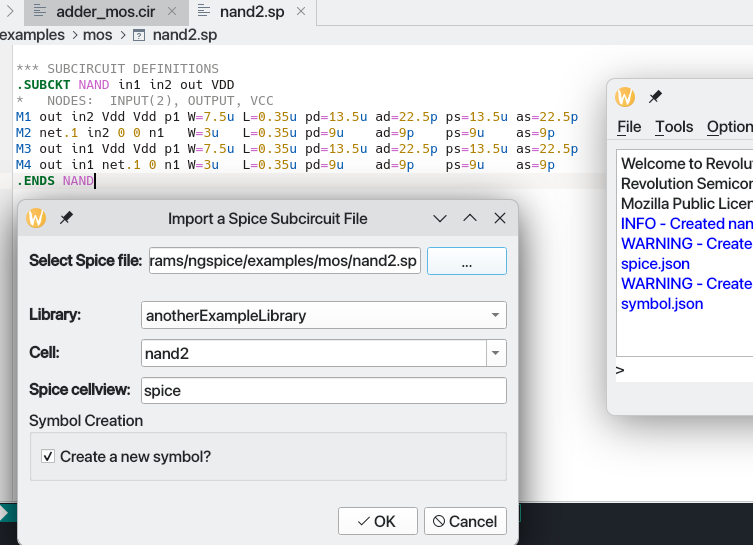
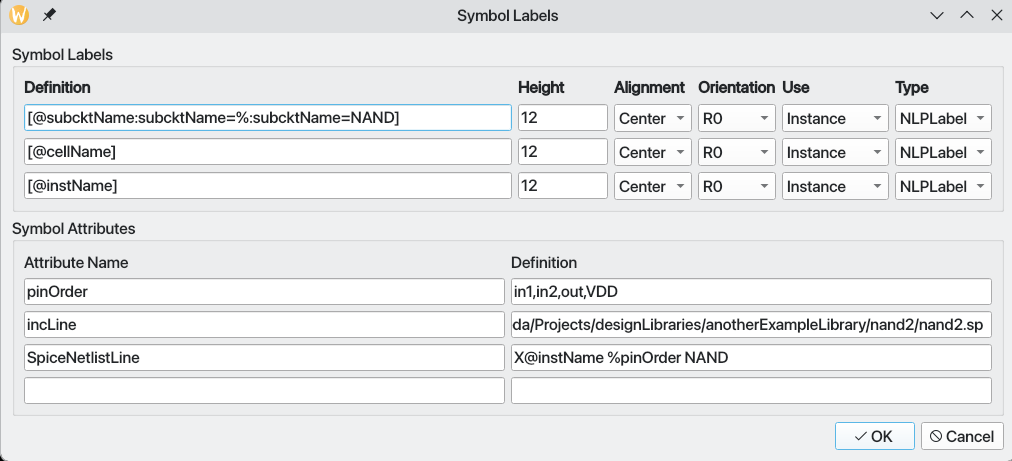
If Create a new Symbol checkbox is checked, a new symbol for the SPICE subcircuit will be
generated:
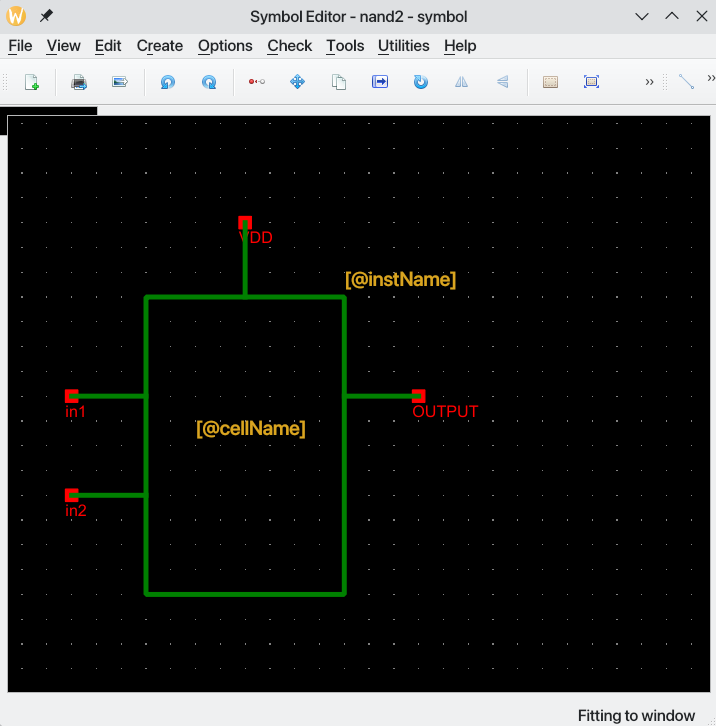
Symbol for imported SPICE file will have symbol attributes generated for successful netlisting with SPICE-like simulators.
Import KLayout Layer Prop. File...: converts a KLayout.lyplayer-properties file into Revolution EDA layer-definition output. This is mainly a technology-setup helper when you want to reuse an existing KLayout layer/color description as a starting point.Import Xschem Symbols...: imports one or more Xschem.symsymbol files into a selected library. The dialog lets you choose the destination library and a scale factor, so this tool is especially useful when migrating symbol sets from an Xschem-based flow.Import GDS...: imports geometry from a GDS file into a dedicated Revolution EDA library. The dialog asks for a target library name plus GDS unit and precision values, making it a practical bridge from external layout data into native layout cellviews.
Practical notes:
- Use imports as starting points, not as a guarantee of perfect one-to-one translation.
- For symbol and layout imports, it is often worth opening the generated result afterward to check scaling, layers, labels, and hierarchy.
- The GDS import dialog defaults the target library name to
importLib, which is useful for keeping imported layout data separate from other design libraries.
Plugins Submenu
Tools -> Plugins -> Setup Plugins... opens plugin management for installed or available
plugins.
The plugin registry window shows available plugins, whether each one is already installed,
and basic metadata such as type, version, and license. It will check the
REVEDA_PLUGIN_PATH environment variable if it is already set or Plugins Path from
Options Dialogue if it is set there separately.
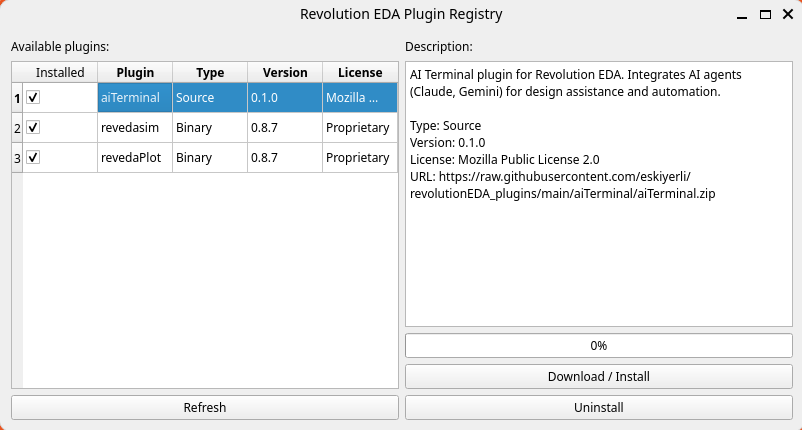
From Revolution EDA Plugin Registry dialogue, you can:
- refresh the registry listing
- inspect plugin descriptions
- download and install a plugin
- uninstall an installed plugin
In normal use, this is the preferred way to add optional capabilities such as simulation, plotting, or AI-assisted tools. After installing or uninstalling plugins, restarting the application is the safest way to ensure menu integrations are reloaded cleanly.
For more detail, see Plugins.
Libraries Submenu
Tools -> Libraries -> Setup Libraries opens the library registry and installation tools.
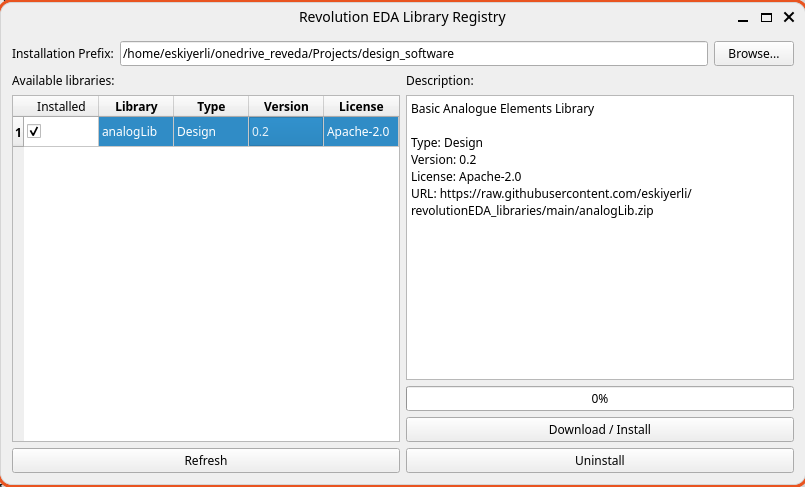
This window is used to browse downloadable design libraries and install them into a chosen installation prefix. It shows whether a listed library is already installed, provides a description panel, and supports refresh, install, and uninstall operations.
Unlike the Library Browser, which manages the libraries already visible in your working environment, the library registry is focused on acquiring library content. When a library is installed from this window, Revolution EDA also updates the active library definitions so the new library becomes available in the Library Browser.
PDKs Submenu
Tools -> PDKs -> Setup PDK... opens the PDK management flow.
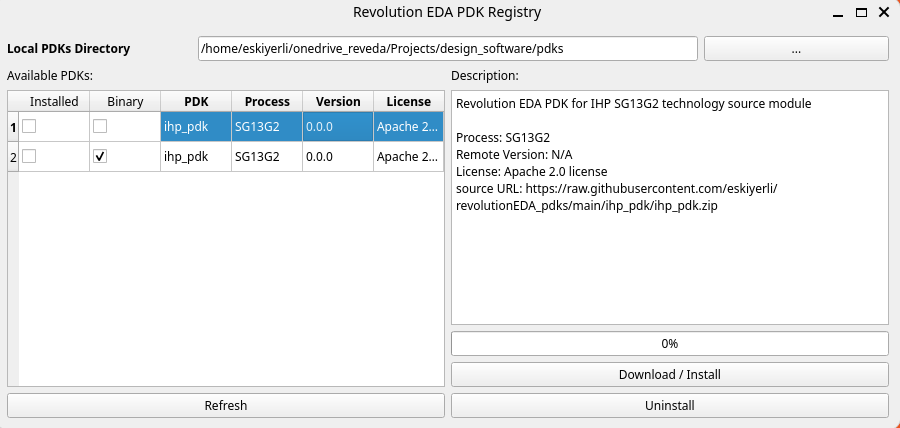
The PDK registry window lets you browse available PDK packages, view process and version information, choose the local PDK storage directory, and install or uninstall PDKs. The list also indicates whether an entry is source or binary and can show when an installed PDK has a newer version available.
This tool is mainly about obtaining and maintaining local PDK packages. Selecting which PDK
the application actively uses is still handled through application configuration such as the
Options dialog or environment variables like REVEDA_PDK_PATH.
Create Stipple
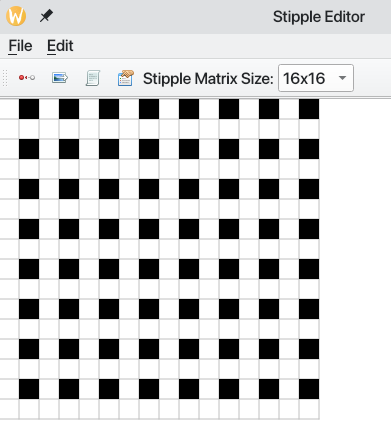
Tools -> Create Stipple... opens the stipple editor used for layout fill-pattern design.
This is a small utility editor for creating or adjusting stipple patterns used in layout display and related layer-visualization workflows. You typically use it when defining custom fill appearances rather than while editing device geometry directly.
Options Menu
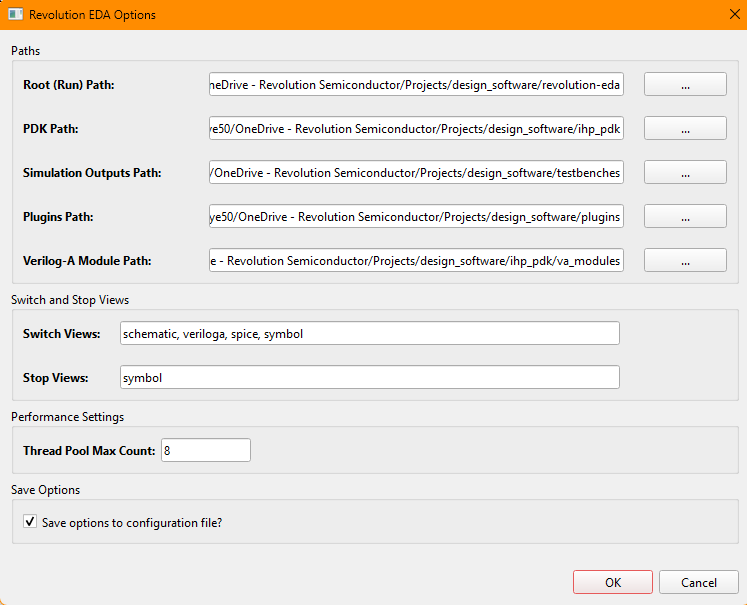
Options -> Options... opens the main application settings dialog.
This is where you configure application-level paths and defaults such as:
- run/root path
- PDK path
- simulation output path
- plugins path
- Verilog-A module path
- switch view list
- stop view list
- thread-pool size
Important environment-related paths may also be provided through environment variables such as:
REVEDA_PDK_PATHREVEDA_PLUGIN_PATHREVEDA_VA_MODULE_PATH
Changes made in the Options dialog can be persisted to reveda.conf by checking the save
checkbox. Additionally, when PDK, plugin, or VA module paths are updated, they are
automatically written back to the project’s .env file.
Help Menu
The Help menu contains:
Help...— opens the integrated help browserLicense...— shows license information dialogAbout— displays application version and copyright
Main Window Concepts
Integrated Python Console
The main window embeds a Python console widget that shows the welcome banner and logging output. On startup it displays:
Welcome to Revolution EDA version 0.9.0
Revolution Semiconductor (C) 2026.
Mozilla Public License v2.0
Application log messages (INFO, WARNING, ERROR, DEBUG) are streamed to this console via a custom logging handler, making it useful for diagnostics, observing import results, and monitoring background operations.
Thread Pool and Background Work
Revolution EDA uses the global QThreadPool for background work. The thread count defaults
to the system’s ideal thread count (minimum 2) with a 30-second idle thread expiry. The
count is configurable via the Options dialog and persisted in reveda.conf.
Plugin and PDK Integration
Plugins and PDKs can extend application behavior, menus, and downstream flows. Their setup is managed from the main window rather than from the individual drawing editors.
- Plugins are loaded from
REVEDA_PLUGIN_PATHor~/.reveda/plugins/. ThepluginsLoaderscans that directory, imports packages, and reads each plugin’sconfig.jsonfor menu wiring. - PDK is loaded from
REVEDA_PDK_PATHor the bundleddefaultPDK/. ThepdkConfighelper reads the PDK’sconfig.jsonfor additional menu actions (e.g., DRC integration).
Splash Screen
A splash screen is shown during startup and project switching. It displays the Revolution EDA logo and a loading message indicating which project is being opened. The splash is dismissed once the main window becomes visible.
Close Behavior
When closing the application normally (via File -> Exit or the window close button), a
confirmation dialog is shown. If the user confirms:
ProjectManager.save_current_state()writes current settings toreveda.conf.- The thread pool is given 5 seconds to finish pending work before being cleared.
- All tracked editor/plugin windows are explicitly closed.
- The application exits.
During a project-switch restart, the confirmation dialog is suppressed — the close proceeds immediately.
Final Notes
- Think of the main window as the launch and configuration hub for the application.
- Think of the Library Browser as the entry point to actual design data.
- Once your libraries and PDK are configured, most day-to-day design work moves into the editor windows rather than the main window itself.
For the next step in a typical workflow, continue with: